Whether you’re looking forward to creating your own nutrient-rich soil amendment or just looking to send less trash to the landfill, composting is an easy practice any household can adopt. And it doesn’t even have to cost anything to get started!
We made this simple homemade compost bin in one house with supplies we mostly already had on hand. There are definitely far more complex and expensive options for composting (including this container we later made from pallets). But to get our compositing feet wet, we followed this easy tutorial to making our own backyard bin. The steps are super simple
Steps For Making Your DIY Compost Bin
- Find a plastic storage bin
- Drill holes in the bin
- Create a dry base
- Add dirt
- Toss in food scraps
- Mix & moisten!
Step 1: Select Your Bin
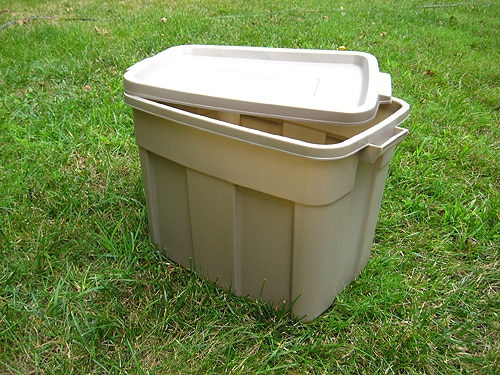
Find or buy a plastic bin with a tight-fitting lid about 24 inches tall or taller (it needs a lid to keep the soil moist and to keep critters out). We picked up a 30-gallon plastic storage bin. We chose a neutral color in hopes that would help it blend in with our backyard, but a dark option may work better for you.
Step 2: Drill Holes In Your Bin
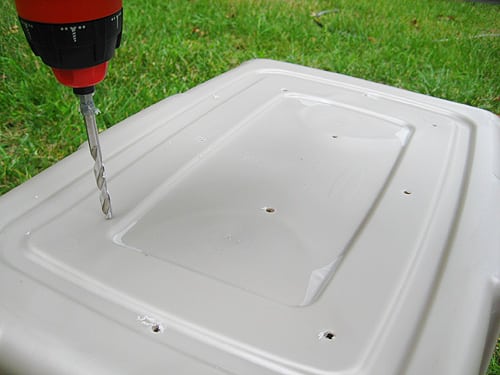
Use a handheld drill to make 8 – 10 small holes in the bottom of the container for airflow, since your organic waste will need oxygen for the composting process to take place. A 3/16″ drill bit or similar works great.
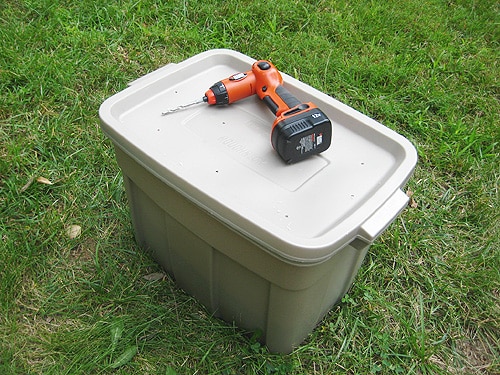
Use that same drill bit to make another 8 – 10 small holes in the lid. Remove the lid for now, but once you’ve finished your bin you’ll want to affix it tightly to the top.
Step 3: Create Your Brown Base
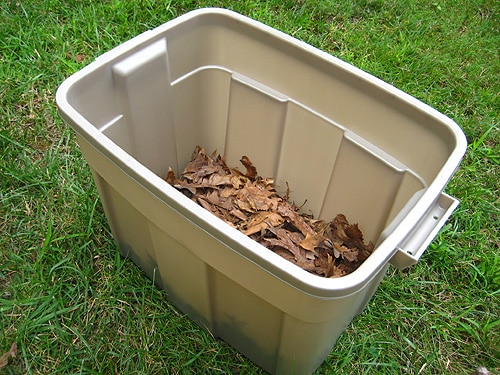
Place some dry leaves on the bottom of your compost bin, filling it about 1/8 – 1/4 full. You can think of composting as layers of “browns” (dead leaves, twigs, etc) and “greens” (food waste, grass clippings, etc.), so this step is the beginning of your brown base.
Step 4: Add Dirt
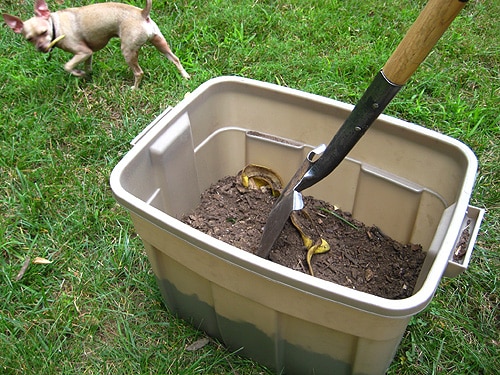
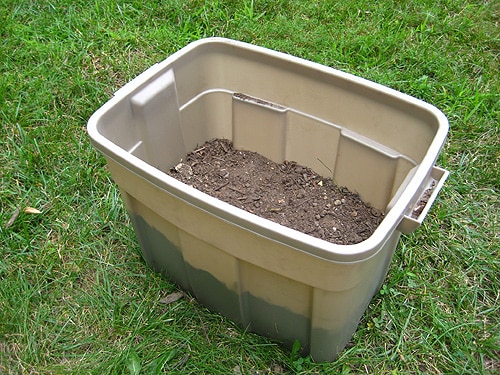
Place dirt on top of the leaves or newspaper until the container is 1/2 full. Again, we have PLENTY of that around, but you could also buy a bag of basic topsoil if needed. It’s not necessary to have worms in your dirt.
Step 5: Toss In Your Food Scraps!
Now to add your “greens!” Place any food scraps or paper products that you’d like to compost! Some great compostable materials are
- Fruit and vegetable scraps
- Coffee grounds, coffee filters, or tea bags
- Eggshells and nutshells
- Paper or cardboard
- Yard or grass clippings
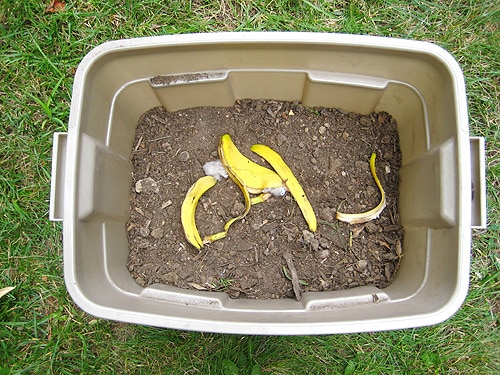
The EPA has a great guide with more items you can compost (as well as things you should definitely avoid – like dairy products or pet waste). Surprisingly, things like lint are compostable so we tossed some in with a couple of banana peels and a small ball of lint. That’s all we had at the moment, but maybe this will encourage us to eat more fruits and veggies? Or do more laundry?
Step 6: Stir Your Compost
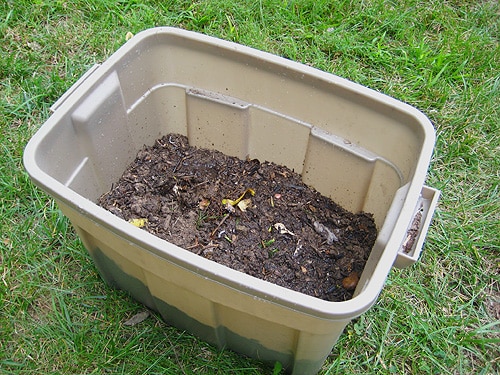
Give your compost a little stir (very little, in our case) with a shovel or stick, making sure to cover your food scraps with dirt. Canine supervision is optional.
Step 7: Moisten!
Spray with lukewarm water until moist, but not soaking wet. (Note: too much water can be the culprit if your compost starts to smell).
Step 8: Find A Convenient Spot For Your Compost Bin
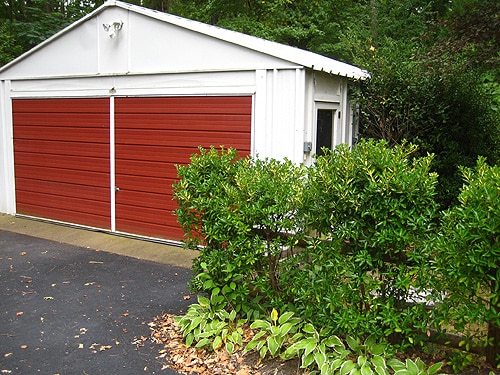
Place the bin in a shady area away from the house (if you live in an apartment or have no backyard you can place your bin on the patio). Be sure that it’s not in full sun or your compost will dry out. We found the perfect spot near our garage where our bin can hide behind some shrubs – inconspicuous and convenient (since we take the garbage and recycling out this way already). Can you spot it? HINT: check the bottom right.
Step 9: Collect Your Compostable Materials Inside
You’ll also want to think through how you’ll collect or separate your compostable waste inside as well (that way you’re not constantly digging through the trash for eggshells or coffee grounds). We wrote about this airtight container we bought to wrangle our food scraps under the sink. It’s tight seal keeps it from smelling between trips to dump it into our bin.

When Is Your Compost Ready To Use?
The amount of time depends on the size of your bin and how recently you’ve added new organic material. It may be ready in a couple of months or take up to a year. Some key signs that it’s ready for use in your lawn or garden are:
- All of your compostable materials have broken down (no food visible in its original form)
- It has a “earthy” or dirt-like smell (not acidic or sour smelling)
- It’s no longer producing heat (it should feel about the same temperature as the air)
- It’s dark and crumbly, not wet or clumpy
Once it’s ready, your finished compost can be used as mulch or potting soil and can also be sprinkled over grass as a lawn conditioner. Remember to save at least 1/3 of it to keep the composting process going. You may also want to create a second bin that you can add your food scraps to while your first bin is going through the decomposition stages to finished compost.
Seems pretty easy, right? And so far the whole thing has cost us less than $10.
Update: We installed a larger compost pile in our new house using old shipping palettes. Click here to check out this alternate composting project.

**This post was originally published on August 21, 2008**
**This post contains affiliate links**
PS: Wanna know where we got something in our house or what paint colors we used? Just click on this button:


Christy says
YAY!!! I have been wanting to do this for a while now. I looked at some store bought bins, but knew it could be a diy. Seems like such a watse to throw out good kitchen scraps. Thanks for the destructions.
PS. WOW! I don’t think I have seen such an uncluttered under kitchen sink for, well ever! I have bins & baskets that are organized, along with old vases & other “junque”.
Katie says
Very inspiring! Great Post!
Katie
Bethany says
Thank you, thank you, thank you for this quick how-to on an easy compost system!!! My mom has had a full-fledged compost pile for years, and I always loved the many benefits it gave us. Once my husband and I bought a house, I found myself with allot of random yard and veggie waste that I wasn’t sure what to do with. I had been thinking of composting it, but was afraid of having a big unsightly compost pile in my yard. Now you have given me the perfect solution. :)
Emily says
I love these tips! My SIL is a composting queen and has all the fancy (and expensive) equipment, but this sounds much more doable for us. Maybe I won’t be the black sheep of my Earth friendly family much longer…we’ll see. :)
Rachel says
I’ve been composting for years now and I just toss it in a pile in the corner of my garden. It’s well spread out so I can visually see where I need to toss more brown matter and where green waste needs to be. I try to do the 1/3’s but it doesn’t always happen. I’ve found that leaving it exposed to rain, sun and birds creates great compost pretty fast. Anything I toss out there the birds go through quickly. I love that they shred it all up, its speeds up the breakdown even further. Of course, you have to have an area set aside that your neighbors can’t see. =)
Shannon says
It’s almost as if you two read my mind to find out what project I’m thinking about tackling but am stumped by, then go ahead and do the work of figuring out the cheapest and easiest way of tackling said project, then post step-by-step instructions with convenient (and sometimes adorable – hi Burger!) pictures. Amazing!
garden buddy says
The Richmond Clean City Commision will be holding a one day event to help Richmonders start composting.
On September 6, 2008 from 9am to 4pm go to the Compost Bin Truck Load Sale at the Willow Lawn Shopping Center located at 1601 Willow Lawn Dr. You’ll find them in the parking lot between Kroger’s and Gold’s Gym.
Get $100 value for just $35! The Earth Machine is an 80 gallon capacity composting bin that fits in any vehicle. Made of recycled materials, over 2,500,000 of these machines are in use across the country!
c says
I love composting! If you have any friends who already have worm compost bin, ask them to give you some worms. And just add them to your compost bin! They will even make it faster to decompose food scraps, and they will eventually multiply over time, so you can share your worms w/your friends. :) And you won’t have to stir. It’s kind of a lot of work if you do daily… Worm will do the work for you!
Another tips : I bet the bin will get fill up quickly with two+ people household, you might want to create another bin, so you can let the full bin sit and decompose all the materials while you are adding more materials to second bin.
Good luck!
Tiffany says
Thanks for this easy project idea. I’ve been wondering where to start with this.
Our lawn mower just died and we replaced it with a manual push mower (no motor, no electric) in an effort to be green. This composting project will be another small thing we can do.
Keep up these green tips. If more people know about the easy things they can do, the better off we’ll all be.
Jen says
Greetings from NYC! I’ve been composting for over a year now, and here are two tips you might want to consider.
1) Get a tight cover for your kitchen compost bin (under the sink) because you’ll be surprised at how quickly any interested bug in a wide radius will find a way in.
2) Consider poking a hole into the bottom of your outside compost bin and collect the ‘tea’ (I swear that’s what it’s called)….or just let it drain out. As things break down (and when it rains heavy) you’ll find your moisture content will get too high. If you collect the ‘tea’ you can use it (diluted) for house plants, etc. Very healthy.
Have fun!
Lori says
I haven’t seen the treehugger.com site yet, but I love the IdealBite.com site for great eco ideas. They have a daily newsletter (the daily “bite”) with an idea or two. Fun to read too, good sense of humor.
Thanks for all you do – love your blog!
Emily says
Many towns (at least in the Northeast) allow you to purchase bins from the town hall at a rate far reduced from hardware or garden store prices. We bought our composter that way.
We use a lidded but large tupperware container for putting “scraps” in till we’re ready to take them to the composter. The lid is important b/c otherwise, the scraps will attract fruit flies.
We have cut our trash output dramatically (gone from two full barrels each week to one not quite full barrel). I imagine in the fall for yard clean up we will cut it even more.
Good luck!
ErinEvelyn says
I 100% guarantee you’ll get giddy about scooping your first batch of compost to use. My suggestion? Mix it with regular potting soil for some potted greens & flowering plants in spring. (Put them on your porch to complement your bargain hanging baskets, perhaps?) Even if you get the tiniest (aka cheapest) plants from your garden center, they’ll grow faster and larger than your’re used to. It’s AMAZING to watch, and very rewarding … almost like a prize for yourself for doing the right thing. Kudos. Welcome to the Compost Club.
Elizabeth says
We started putting our composting food container in the fridge so it won’t smell or attract insects. It also enables us to collect scraps for a few days and then add them all at once, rather than having to take it out more frequently. Does anyone else have trouble finding enough ‘brown’ matter to compost? We always end up with too much food and not enough other stuff…
YoungHouseLove says
Thanks for welcoming into the Compost Club, ErinEvelyn! I’m already excited about scooping out my first batch so this is currently a good exercise in patience.
Garden Buddy, great tip on the EarthMaster sale in Richmond. $65 below retail!? You’re speaking my language. But alas, I think we’ll let some completely-compost-bin-less person take advantage of the “limited supplies.” Plus, I couldn’t shun my own creation so soon…
C, we’ll go on a friends-with-worms hunt this weekend. Sounds weird, but exciting at the same time.
Thanks also to everyone for the advice on storing scraps inside. We haven’t noticed a smell or fly problem yet, but we’ll keep our eye out for a nice, lidded container. Jen, good tip about the “leak” too – I had read briefly about that but wasn’t quite sure what it meant. We’ve already got holes in the bottom so I’m thinking I’ll grab another, larger tupperware lid for it to sit on and help collect leak-age.
And to all those starting their composting journey with us. Please keep us posted. Hopefully we can all learn from each other in this!
Happy scrapping everyone!
-John
Tanya says
I have just recently started to dabble in the world of composting too, much to the excitement of my mother, who is an avid composter. I have a pile in the back corner of our yard (which is welll hidden) but my mom does the bins like you have going. She has two though, so she can have them at different stages.
I have my younger brother bringing me fruit peels and such from Tropical Smoothie (where he works) to make my pile grow faster (in addition to my house scraps). I probably would get a smaller container for my house scraps though, it would reduce the chance of any unsightly smells. I need to get some worms for it, that would be less work haha.
Man you know you are old when composting interests you haha!
Good luck to you!
Samantha says
This looks so easy & affordable! Can’t wait to try it. Not all I need is a backyard…mmmm!
Lisa B says
I’ve been thinking I should compost for the Spring season coming and I was so bummed to see all the expensive “composting tumblers” etc. What a great use for the ol’ rubbermaid tub! I like this idea too because if I loose interest or my soil doesn’t compost correctly, I’ve only invested a few bucks! Thanks so much for the idea!
PS I love your blog so much!!! It’s so inspiring!!!
Jan says
I have always wanted to compost and this sounds like the perfect way for me….easy! My question is about adding scraps to the compost bin. Do you just keep adding until it is full? Is there a certain amount of time to wait between adding scraps to the compost pile and actually using the compost? I am really new at this.
Tks…
YoungHouseLove says
Hey Jan,
Weather and other circumstances (like what you’re composting) can definitely make things vary, but we’ve found that after about three months of adding compost and stirring, the bin seems full so we set it aside and let it “rest” and just peek under the lid to see how things are doing until it looks like rich, lush dirt.
It really is a foolproof process because if you just keep adding to the bin until it looks full and then stop adding stuff and wait for the dirt to do its thing, it’ll be nice and obvious when things inside break down and you’re left with lovely soil to feed to your plants. We found that adding a second bin allows us to use one while the other “composts” so we always have a place for scraps. Hope it helps!
xoxo,
Sherry
Rachel says
I’m so excited to start composting. I have a rubbermaid tub all ready to go. My question is though…what about animals? Our yard backs up to woods and we have raccoons out there all the time…
YoungHouseLove says
Hey Rachel,
Good question! We actually have a huge woods behind our backyard too (we’ve seen deer but no raccoons), but the lid of the tub stays on extremely well (we’ve never seen it pop off due to bad weather or animals or anything like that) so your compost should be totally safe. Hope it helps! Happy composting…
xoxo,
Sherry
Piper says
For those tht are hunting for worms. You might try your local bait shop. They always carry worms for the fishermen.
I’m going to make this easy ‘to do’ compost container. Like most, I don’t want to spend the high dollars to purchase composting equipment.
Great Idea!
Piper
Kendi says
Hello there! I’ve been following your blog for a couple monthes now (I actually came across it after doing an internet search for DIY rain barrels) and I think this compost post is very interesting! I’m curious how your bin is doing now that it’s been several months. Have you expanded beyond 2? Appx how long did your bins take to produce usable compost? What new suggestions do you have now that you have been composting for awhile?
Thanks! and Happy composting!
Kendi
YoungHouseLove says
Hey Kendi,
Our bins are doing great. We’ve already used all of the compost out of one and have even started a second batch! We haven’t expanded beyond 2 yet, though it certainly couldn’t hurt our garden to have more compost ready. As a family of 2 I think we’re just a smidge short of compostable matter. Since we started our bins in the fall we didn’t start using them until a couple of months ago, at which point they were ready. That was about 4 months. But hopefully with it being warmer out things will compost much faster. The only tip we’d offer beyond our original post is that (1) it seems hard to go wrong and (2) be sure to used a closed container where you’re collecting in the house. The open container we originally tried quickly produced fruit flies.
Enjoy and good luck!
-John
Rachel says
I’ve been composting for about two months, but I’m not sure I’m doing it “right.” I put scraps in there and occasionally add more dirt and dried leaves (or paper shreds). It looks completely nasty in there with lots of bugs (but I am assuming that’s good?!) I just don’t know when it’s “ready.” Also, when should I stop adding stuff and just let it sit?
YoungHouseLove says
Hey Rachel,
We actually follow the steps mapped out above, so we continue to add food scraps and stir but we don’t add leaves and dirt as we go (that’s all in there to begin with, and it just gets moved around when we stir things). Following that method only takes a few months to produce finished compost that’s ready to use (especially in the warmer weather where it goes much faster). So since we now have two bins going, after about a month of adding to one bin we switch to the other so the first one can “finish” for a month and we can use it and then restart the process. It really helps to have two so we can do them in tandem and each one gets to compost while we’re actively dumping in the other one. Hope it helps!
xo,
s
Karla says
Wow! This is like looking under MY OWN counter!! We started a compost pile about a year ago and have a lot of bins under our counter and the VEGGIE WASH too! :) Ironically, I just created a blog post yesterday specifically on compost ‘piles’ here: http://gogreen101tips.blogspot.com/2009/08/start-compost.html
I am in love with your site! I have literally spent 2 hours today just going through all of your tips, posts and photos. I really love simplistic and cozy style, specifically beach house decor and your site is a breath of fresh air and is very inspiring! Keep on doing what you do! :)
Emily says
Thank you for this post. I have been lookig at composters for a while now but didn’t want to fork out the dough. So thank you for this simple and frugal DIY!
rhiannon says
what do you do about the wet matter that collects at the bottom? the leachate? you don’t have a spout or anything, do you just stir it around at the bottom?
YoungHouseLove says
The bottom of the compost bin has drilled holes for drainage and to let worms in so a good stir every time we add stuff keeps everything looking good and working well in there. Hope it helps!
xo,
s
Katey says
I followed the steps and made a compost bin! I feel so green. Only one problem.. Nats! (in the outside bin) Well, maybe two problems. It doesn’t smell really bad, but it does smell a bit. So, I saw that you said too much water might be the culprit for the smell. What about the nats? I went outside to add to my bin this morning, saw the nats when I lifted the lid, slammed it shut and ran! Help!
YoungHouseLove says
Hey Katey,
So glad you made your compost bin! Wahoo. As for the gnats, we didn’t have that problem but it could be related to too much water (gnats would probably be attracted to a moist swampy environment) so our advice would be to try to drain out a bit of the water through those holes (and through stirring). We also would just suggest waiting a few days for things to settle (keep your compost in a sealed container under your sink for a few days and then add it when things seem to calm down outside. Our compost bin is pretty much completely unscented and we never have bugs flying around it (although worms are doing their thing in the soil to help break things down- which is a great thing!). Hope it helps!
xo,
s
Mikal says
I am a compost educator for our community and gnats are a common composting problem. I know this post is a couple years old, but just in case anyone still visits it, I thought I would comment.
One way to reduce the amount of gnats of flying insects is to add in several inches of shredded paper at the top of your bin. Spray the paper with a water bottle until it is moist (think wrung out sponge). Don’t mix it in with the other composting materials. The shredded paper acts as a barrier and makes it more difficult for tiny flying insects to locate the food source. Worms love the shredded paper and will often nest in it (they feed on it too).
YoungHouseLove says
Great tip!
xo,
s
Brianna says
I am playing around with the compost idea considering I live in an apartment… what kind of closed container did you get for under the sink? I’m looking for some affordable ones.
YoungHouseLove says
Good question! We ended up getting one for around $10 at Bed Bath & Beyond that has little push buttons on the side that “seal” the top. Just sort of like a plastic cylinder where the top sinks in and locks when you push those buttons so it’s airtight. We love it!
xo,
s
Jay Fluck says
I had heard of composting awhile ago and always wanted to give it a try…too bad I can’t add my dogs poop to the compost bin :(
Hawken Brons says
This is a good idea. Too bad I want something bigger that can go next to the house.
Bailey says
I love this post! What a wonderful way to go green and help keep your gardens kickin’. I am super eager to make a compost bin this spring. I was skimming through the posts above and it seems like warm weather helps decompose faster, but I was just curious how do composts work in the winter when everything is frozen?
YoungHouseLove says
Things definitely slow down in the colder months but we keep on adding things because there are still worms in there munching away. By the time spring rolls around they’re ready to go!
xo,
s
Kim says
Thank ya’ll so much for this post. I was always led to believe that you had to have a big expensive compost tumbler in order to make compost. But not so, apparently!
I went to Lowe’s today and bought one of those big containers, and once I find the drill (I know we have one), I’ll be in business!
Thanks again!
Sara C says
Hi!
Do you guys have a problem with gnats getting in your compost bin? I made one exactly like yours a few weeks ago and every time I open it to add to the compost I get swarmed with gnats.
I live in southern Alabama… I don’t know if that makes a difference.
Thanks!
YoungHouseLove says
Hmm, we don’t have a gnat problem but maybe your compost is too moist (gnats love moisture)? We’d try drying it out or draining it a bit. Hope it helps!
xo,
s
Nicole says
Love your site!
I live in Lexington, KY and we have a city program that takes old city garbage bins and repurposes them into compost bins. And it’s free!
(you don’t have to post this, but here is the website to give you an idea of what it is and how it works: http://www.lexingtonky.gov/Modules/ShowDocument.aspx?documentid=7191
Maybe other cities including Richmond have similar plans?)
YoungHouseLove says
Thanks for the tip! We’ll definitely check it out.
xo,
s
Amy says
I’m so frustrated! I use those Lowes Rubbermaid bins for garage storage and thought it would be perfect to compost in and pick up a couple more for additional storage. When I went to buy them they were nowhere to be found. I don’t know when, but apparently they stopped selling them and I can’t find them anywhere.
YoungHouseLove says
Try Target or Walmart. We’ve seen them there quite recently. Hope it helps!
xo,
s
Matt&Kelly says
My wife loves this blog and usually sends me idea’s or direct links to your site weekly! After reading all the posts here (and wanting a DIY Composter as well) we’ve decided to give the plastic container a try and see how it goes. One thing that I’ve heard, but not yet tested, is that if your compost is moving slower than you expected you can add Rid-X to the compost. It’s got all the good stuff to break materials down, although I’m not sure how the worms would take to it.
YoungHouseLove says
We’ve never heard that tip. Interesting! You’ll have to tell us how it works if you try it. Good luck and happy composting!
xo,
s
Kelly says
Oh, I love this and think I can do it! However, I rent and I haven’t been able to get the landlords to approve a bin outside the house. In truth, I haven’t found a perfectly inconspicuous and convenient area either.
My question is, can I have this in a 3-season porch? If so, this will be my weekend project!
YoungHouseLove says
We actually wouldn’t recommend it for a three season porch since you drill holes in the bottom of the bin (which is where gross compost juices leak out and also where worms climb in). So you’ll want to keep your bin out of a place where it can be smelled (they’re not super smelly, but they don’t smell like roses either). You’ll also want dirt and worms in the ground below, to help the compost do it’s thing. Hope it helps!
xo,
s
Snickrsnack Katie says
Wanted to drop by this thread and let you know I started a compost bin (with your exact instructions) a couple of months ago, and it is absolutely amazing! It is working spectacularly, and definitely doing its job. I was showing my mother-in-law how it works, and we were amazed to see all the little earthworms in there doing their job! I have definitely started a trend in my family and with my friends – I am going to be helping my mother in law create her own compost bin sometime soon! The loads of trash that we normally would take out have been cut in half. Composting along with recycling is so easy – and I want to thank you for putting your instructions on how to create a bin out there for the rest of us.
Thanks!
YoungHouseLove says
That’s awesome! So glad it’s working so well. We’re in love with ours too!
xo,
s
Laura J says
Hi John & Sherry! My husband and I are ready to start composting but I have a couple of questions first. We bought a rubbermaid (36 gal) container with a tight lid (size 30x20x20). Is this too small since you recommend one that’s 24 inches tall or taller? I haven’t drilled any holes yet so if I need to exchange the bin I have now, it’s not a problem. Also, we’re from SC and have ONLY red clay. Can I use this instead of “regular” brown dirt to start the compost? Thanks so much!
YoungHouseLove says
Both good questions. We’d assume your container should work out just fine, but if you’d like to be safer rather than sorry you might just want to exchange it for something a bit bigger just in case. Either way you’ll probably be a-ok. As for the clay, we’re not sure if you can use that, but you could also purchase a bag or two of topsoil for a buck or two at your garden center to be sure that your compost center work like a charm. Otherwise you might be able to google around to see if red clay would work instead. Good luck!
xo,
s
Darla says
We just throw all our food scraps (other than meat and dairy) in the leaf pile behind our shed. It’s pretty rancid and stinky though. Does it need to be stirred up more often? Is there some other food items that we shouldn’t be including in compost?? Oh, and of course it gets rained on all the time and dried out again with the sun. Is this not good??
YoungHouseLove says
Hey Darla,
Your little food scrap pile sounds like it could work, but creating an actual bin would help contain the smell and make things break down a lot better to create rich soil (since it won’t dry out from the sun or get too wet from the rain). Just take our tutorial for a spin, and follow the link in step 5 of the post to find out what food items you can and can’t add to compost. Good luck!
xo,
s
Newness says
Hi! I’ve been stalking your blog and I truly appreciate your tutorials. I want to try your composting idea but am wondering a few things because of my location. I live in the midwest (Minnesota) and it gets COLD in the winter. I don’t intend to start my garden until next summer but would love a jumpstart on composting so I’ll have plenty when I start. In your opinion should I wait till the spring to start my composting or start now? If I start now, how will the compost fair during this winter? And when I say cold I mean COLD.
Any advice would be appreciated! (this weekend I plan to use your funiture painting tutorial to jazz up an antique vanity I scored. Can’t wait!)
YoungHouseLove says
We definitely think you should start now! You’ll gain at least a few more months of things breaking down before it gets too cold (and already establishing it now in the end of summer instead of the beginning of next spring is your best bet!). Over the winter it will probably slow down when it comes to breaking down (but still do your best to stir things a bit when you can). We can’t promise that you’ll definitely have compost that’s ready to use in the very early spring months, but by summer it should be totally ready!
xo,
s
Newness says
Thanks for such a quick response. I plan to get the composting supplies this weekend! I have another question: Does the initial dirt need to be potting soil or just any ole dirt from the yard?
YoungHouseLove says
We think either should work just fine. Dirt from your yard (as long as it’s not clay) should be full of nutrients and bugs and maybe some worms if you’re lucky- so in some cases it can be better than potting soil!
xo,
s
Gina says
Hi there, i have made my compost bin (yay!) but have just noticed a sticker inside the bin i am using, which says “from recycled materials, not for food”. would that matter for compost…?!
YoungHouseLove says
Hmm, I guess if you’re using the compost in an edible garden (which might absorb nutrients and ingredients from the bin) it might not be the best container to use, but if you’re using it to create soil for planting non-edible things like bushes and flowers it should be just fine. Hope it helps!
xo,
s
Jackie says
If you are into composting check out this neat website on worm composting.
http://homepage.mac.com/cityfarmer/PhotoAlbum23.html
I love your site it gives me lots of ideas for this house of our that is into its fourth year of renovations!
YoungHouseLove says
Thanks for the link! Off to check it out…
xo,
s
Newness says
Sherry, I am sad to report I started my compost bin, following your instructions. I was super pumped and started collecting my dryer lint, tea bags, egg shells, etc. I had the bin in my back yard for about 3 days before the squirrels began EATING a hole in my bin. I even posted a picture in my blog. The picture in my blog was earlier that day and by the end of the day the hole is the size of the opening of a coffe mug. I am so mad at those little vermin. I don’t know what to do now. The squirrels also have chewed holes in my recycling bins and garbage bin. And I know for certain it’s the squirels because I caught the lil booger in the act!
Ok sorry to vent here. But if you have any suggestions I am open. I really want to do something before next spring when I finally start my garden. Thanks!
YoungHouseLove says
Oh no! That stinks! Maybe try googling around for a wood crate DIY tutorial that might be less “edible”? Good luck!
xo,
s
The Mango Archives says
Thanks for the tutorial. I followed it to the T–dog supervision and all (see here: http://themangoarchives.wordpress.com/), but I opened it up about a week later and there was little plants growing from it (they were like 6 inches tall!). I guess the yummy compost makes for really fast growth. Any ideas as to whether this is a bad thing?
YoungHouseLove says
Hmm, we’re not sure what that could be. Maybe just leave it since it’ll probably die off in the winter but be careful about using your compost in the garden (start slow just in case those plants start springing up everywhere). Good luck!
xo,
s
Laurie says
In our little corner’o’Canada our town collects ‘green waste’ (Kleenex, food scraps, tea bags, coffe grounds, egg shells etc) but often our weekly green bin is full. I’ve been wanting to start up a composter to use up the excess green waste. Thanks for the very easy to follow instructions!
Erin says
My husband and I just did this very thing. I guess great minds think alike!
Krista says
Are you composting and gardening at the new house?
YoungHouseLove says
We still have the same old plastic compost bins in the new house and plan to start a garden as soon as we can (and update our compost situation to something more built-in someday). Can’t wait!
xo,
s
Cheri says
Just came across your blog…love it :)
Just wanted to share our composting experience. Pit composting. Dig a hole anywhere and bury your kitchen waste. Doesn’t cost a cent :) Google pit composting or trench composting for details.
YoungHouseLove says
Never heard of it! Sounds quick and easy!
xo,
s